| View previous topic :: View next topic |
| Author |
Message |
Scott LaBorde
Joined: 14 Dec 2009
Posts: 104
Location: North Carolina


|
 Posted: Oct 20, 2010 13:42 Post subject: Specimen stabilization for photographing Posted: Oct 20, 2010 13:42 Post subject: Specimen stabilization for photographing |
|
|
I've been using something called Geo-Tac to hold my specimens in place for photographing, however there is a problem with the specimen slowly drifting toward the weighted side as the Geo-Tac gives in to gravity. The Geo-Tac is not strong enough to keep the specimen perfectly still and obviously this affects the quality of my photography espcially for longer exposures. Is there some other sturdier material or perhaps device(s) that someone can suggest that would ameliorate my situation. It obviously needs to be discrete and small yet sturdy enough that it keeps things in place. I've though about using wax, but that would be too messy and repositioning would be a pain.
Scott
_________________
Scott LaBorde |
|
| Back to top |
|
 |
Pete Richards
Site Admin
Joined: 29 Dec 2008
Posts: 846
Location: Northeast Ohio
|
| Posted: Oct 20, 2010 15:02 Post subject: Re: Specimen stabilization for photographing |
|
|
Modeling clay is more stable against sagging than those sticky-tac things, but it is somewhat oily and not easy to use, at least until you get it warmed up.
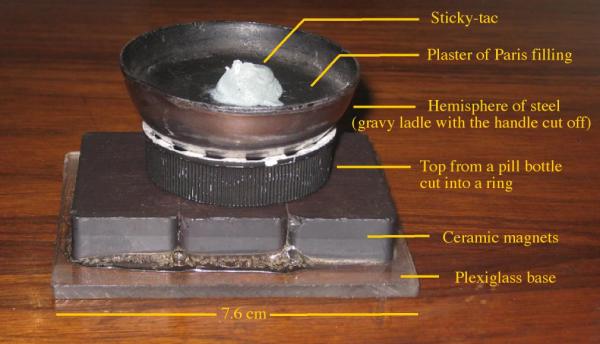
For micros and other relatively small specimens, I mount them with sticky-tack on the device in the picture. It allows me to adjust the position of the specimen without unsticking it. I suppose it could be used with clay, but I generally don't find it necessary.
Pete Richards
| Description: |
| My specimen holder. The (or at least some) Germans call this a Kugeltisch - a ball or sphere table. |
|
| Viewed: |
21172 Time(s) |
|
_________________
Collecting and studying crystals with interesting habits, twinning, and epitaxy |
|
| Back to top |
|
|
Paul S

Joined: 20 Mar 2010
Posts: 79
|
| Posted: Oct 20, 2010 16:22 Post subject: Re: Specimen stabilization for photographing |
|
|
I posted my stabilization system here: https://www.mineral-forum.com/message-board/viewtopic.php?t=1150
I made it myself and it's easy in use. Pete also posted his system there with the seperate parts. These systems work great for small specimens. Larger ones normally need different systems.
For the larger specimens you could use a flat container with a layer of sand or better: rice. That way you can angle them a bit and adjust the angle easily. It gives full support to the specimen, which is important to prevent any instability leading to the specimen falling over and getting damaged.
But I guess there are many systems out there being used, so all input is welcome!
|
|
| Back to top |
|
|
Luiz Menezes
Joined: 10 Dec 2009
Posts: 140
Location: Belo Horizonte
|
| Posted: Oct 21, 2010 05:48 Post subject: Re: Specimen stabilization for photographing |
|
|
I use 2 different types of "mineral tak"; if the specimen is much unstable over the acrylic stand on the best-looking display position I use "blu tak", manufactured in Australia by a company called Bostik and distributed to mineral dealers on the USA by Williams Minerals; many times even with this strong tak the mounting may not remain stable, so I have to glue one or more small acrilic "pegs" to the stand, adjustd to the bottom of the specimen in order to keep it standing-up. But if the bottom of the piece is near flat and the specimen can stay stand-up by itself over the stand or only need a small amount of tak to remain that way I use a softer (and cheaper) tak sold in Germany by Mikon or Kranz and on the USA by Michael Shannon.
The "blu tak" is grayish-blue and the other is light gray; to mount small specimens into thumbnail boxes with styrofoam I only use the softer European tak because "Blu Tak" would became solid after one or two yeas and then most pieces will detach from the styrofoam (carving a small hole on the styrofoam); by the other hand the softer tak will not solidify.
But I have a problem with "blu tak": my specimens that remain in Tucson, inside a self storage unit, without thermal control, in between mineral shows, are submitted daily to average temperatures above 30 degrees Celsius, and every night it drops 15 degrees or more, and this causes the tak to soften, so before the next Tucson show I have to remove the tak on most specimens and throw it away; it does not happen at the same speed at my warehouse in Belo Horizonte, because here the temperature changes are much milder (and the moisture on the air much higher, at least during half of the year); it also does not happen at Tucson with the pieces mounted with the softer tak.
I also only use the softer tak for specimens that have a brittle base, because using "blu tak" it may happen that when we try to remove it from the specimen part of it can remain attached to the tak
.
|
|
| Back to top |
|
|
Jesse Fisher

Joined: 18 Mar 2009
Posts: 640
Location: San Francisco
|
| Posted: Oct 21, 2010 09:36 Post subject: Re: Specimen stabilization for photographing |
|
|
| I have found that it is easy to position specimens either for display or photography using various shaped wedges cut from wine bottle corks. These can easily be cut to almost any shape needed using a sharp knife or razor blade and can be affixed to the specimens wit the sort of tack that Luis discusses, or a more permanent adhesive. I have personally given up on the blue-gray European variety of "Blu-Tak" because it gets hard and brittle fairly quickly. After this happens, it is rather difficult to remove the residue from specimens that it has been in contact with for any length of time without using some nasty organic solvents.
|
|
| Back to top |
|
|
Scott LaBorde
Joined: 14 Dec 2009
Posts: 104
Location: North Carolina
|
| Posted: Oct 22, 2010 07:17 Post subject: Re: Specimen stabilization for photographing |
|
|
Thank you for these great ideas. I'm taking them all into consideration and will be using parts from them all. You prove necessity is the mother of invention.
_________________
Scott LaBorde |
|
| Back to top |
|
|
Scott LaBorde
Joined: 14 Dec 2009
Posts: 104
Location: North Carolina
|
| Posted: Mar 20, 2011 22:08 Post subject: Re: Specimen stabilization for photographing |
|
|
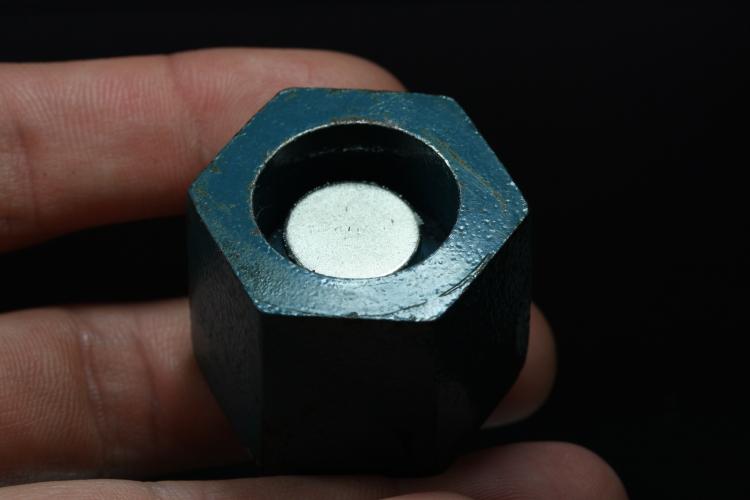
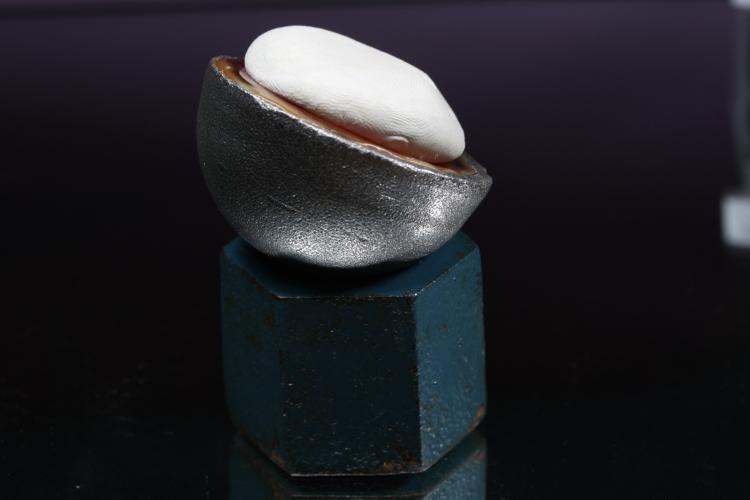
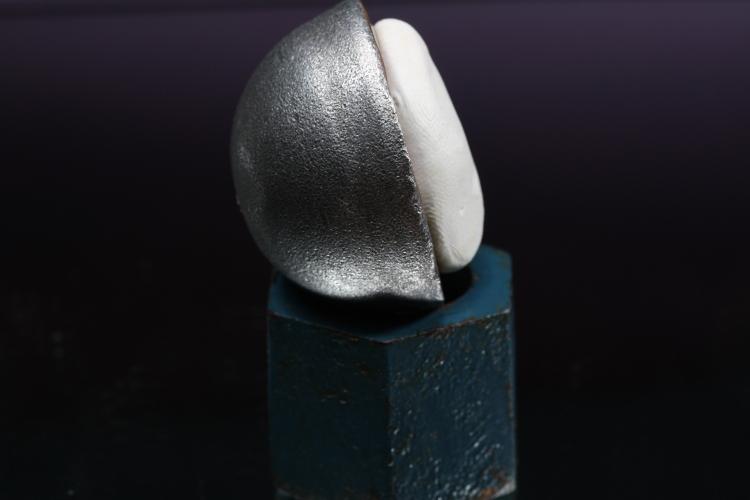
Pete, I really liked your idea so I copied it, changing only the parts used. The base is a large bolt I found on the ground during a field excursion. Its weight is ideal for stability even with larger pieces. Because it's already metal the neodymium magnet I placed in the socket will stay without glue. I had to order the metal hemisphere online because I didn't have any such ladle or measuring spoon I could use from the house. I was very happy with the amount of play I had with the angles. Thank you Pete for the great idea.
| Description: |
| the base and neodymium magnet |
|
| Viewed: |
20112 Time(s) |
|
| Description: |
| base and metal hemisphere |
|
| Viewed: |
20127 Time(s) |
|
| Description: |
|
| Viewed: |
20193 Time(s) |
|
_________________
Scott LaBorde |
|
| Back to top |
|
|
John Cornish
Joined: 19 Oct 2009
Posts: 129
Location: Port Angeles
|
| Posted: Mar 21, 2011 08:20 Post subject: Re: Specimen stabilization for photographing |
|
|
Hi Scott and All,
Consider using a small piece of aluminum foil. The foil will compress around the specimen and can be configured into nearly any position. With a bit of care, the foil can be molded behind the specimen and will not be detectable. All the very best,
John
|
|
| Back to top |
|
|
Scott LaBorde
Joined: 14 Dec 2009
Posts: 104
Location: North Carolina
|
| Posted: Mar 21, 2011 08:45 Post subject: Re: Specimen stabilization for photographing |
|
|
John, I never thought of using tin foil. That's another great idea. I could combine it with Pete's method. Thanks for sharing that.
_________________
Scott LaBorde |
|
| Back to top |
|
|
|