| View previous topic :: View next topic |
| Author |
Message |
Paul S

Joined: 20 Mar 2010
Posts: 79


|
 Posted: Jun 07, 2010 13:07 Post subject: A DIY Ball Table Posted: Jun 07, 2010 13:07 Post subject: A DIY Ball Table |
|
|
I have come up with a cheap solution to a common problem. While looking at minerals through a microscope, it happens a lot that a specimen needs to be viewed under a different angle to get a better focus or to get a better view of a certain part of the specimen. One could use sand or forms of fixation kit or rice to position the specimen at a different angle, while preventing it from falling over. I tried those methods, but I was not satisfied with them. They are not accurate enough and one needs to touch the specimen a lot to get the tilt right.
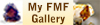
So I came up with the following tool: a ball table. They can be bought, mostly designed for specific microscopes, but they are very expensive. So I build one myself from various parts I had lying around. As you can see in the photos, I used a piece of wood with a hole in it, I glued another one underneath it, so the plastic ball could sit in the hole. There was however not enough friction between the wood and the plastic, so I added a rubber band to make sure the plastic ball would not move after being tilted. In the plastic ball, I added a bit of sand as extra counterweight and I glued a round piece of wood in the plastic ball for the specimen to sit on. I then added some grey 'blue tack' (its a kneadable form of rubber eraser) so specimens won't slide along the surface.
I also made a clear version for through lighting, it consists of the same plastic ball, but this time I glued a petri dish into it. It sits a bit higher into the ball, but only smaller specimens will require through lighting, so its not really a problem.
Of course the whole setup works only for smaller specimens, but everything that will fit underneath my microscope will fit on the ball table.
I hope this bit of kit will inspire you all, for I have found it very useful and easy to operate.
| Description: |
| Top left and clockwise: 1) normal ball table, 2) translucent ball table, 3) the 'ball' and the 'table', 4) close-up of the rubber band. |
|
| Viewed: |
20658 Time(s) |
|
|
|
| Back to top |
|
 |
Pete Richards
Site Admin
Joined: 29 Dec 2008
Posts: 828
Location: Northeast Ohio
|
| Posted: Jun 07, 2010 14:21 Post subject: Re: A DIY Ball Table |
|
|
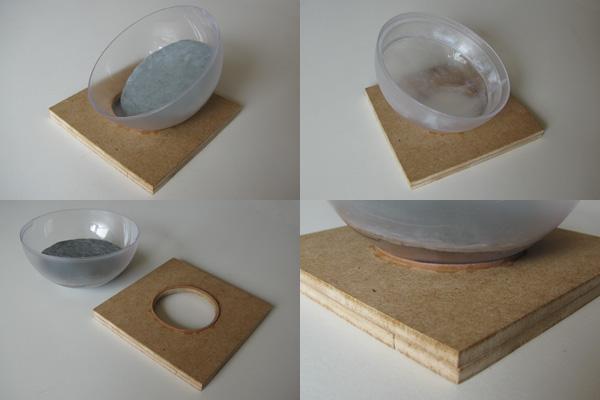
Here's my version. A hemispherical steel bowl (actually was the bowl from a gravy ladle), a plastic jar cap with the top cut out, and a few ceramic magnets glued to plexiglass. The steel bowl is partly filled with plaster of Paris, painted black. The steel bowl does not quite touch the magnets, but the attraction creates enough friction to keep the bowl oriented as desired.
It works great and is very useful and efficient for orienting specimens for viewing or photography under the microscope.
| Description: |
|
| Viewed: |
20630 Time(s) |
|
_________________
Collecting and studying crystals with interesting habits, twinning, and epitaxy |
|
| Back to top |
|
|
Paul S
Joined: 20 Mar 2010
Posts: 79
|
| Posted: Jun 08, 2010 02:38 Post subject: Re: A DIY Ball Table |
|
|
That is a very nice system you came up with Pete, I guess that even specimens which are top-heavy can be tilted under a large angle.
I did wonder, are metallic and magnetic minerals a problem due to the large magnets that hold the bowl?
|
|
| Back to top |
|
|
Pete Richards
Site Admin
Joined: 29 Dec 2008
Posts: 828
Location: Northeast Ohio
|
| Posted: Jun 08, 2010 07:51 Post subject: Re: A DIY Ball Table |
|
|
| Paul S wrote: | That is a very nice system you came up with Pete, I guess that even specimens which are top-heavy can be tilted under a large angle.
I did wonder, are metallic and magnetic minerals a problem due to the large magnets that hold the bowl? |
Thanks! I'm very pleased with it. I have not had any problems with metallic or magnetic minerals. The only problem I have is that if the specimen is too heavy and the ball is tilted well away from horizontal, the ball may slip (or the sticky tack may stretch) due to the weight.
_________________
Collecting and studying crystals with interesting habits, twinning, and epitaxy |
|
| Back to top |
|
|
Scott LaBorde
Joined: 14 Dec 2009
Posts: 104
Location: North Carolina
|
|
| Back to top |
|
|
Pierre Joubert
Joined: 09 Mar 2012
Posts: 1605
Location: Western Cape
|
| Posted: Aug 21, 2014 11:38 Post subject: Re: A DIY Ball Table |
|
|
| Scott LaBorde wrote: | I have taken Pete Richards design and slightly modified it. I created a video to show how it works and how simple it is to make.
** In the video I incorrectly label the steel ball a "ball bearing" when it's just a steel ball (apparently a common misnomer - oops). |
Excellent Scott. I have only one concern, the specimen may come loose and fall on the metal.
_________________
Pierre Joubert
'The tree of silence bears the fruit of peace. ' |
|
| Back to top |
|
|
Scott LaBorde
Joined: 14 Dec 2009
Posts: 104
Location: North Carolina
|
| Posted: Aug 21, 2014 14:05 Post subject: Re: A DIY Ball Table |
|
|
| Pierre Joubert wrote: | | Scott LaBorde wrote: | I have taken Pete Richards design and slightly modified it. I created a video to show how it works and how simple it is to make.
** In the video I incorrectly label the steel ball a "ball bearing" when it's just a steel ball (apparently a common misnomer - oops). |
Excellent Scott. I have only one concern, the specimen may come loose and fall on the metal. |
Yes Pierre, that something I have thought about. Depending on size and value of the specimen, extra precaution such as padding around the base might be desirable. It is the concept and simplicity of using a steel ball and ring magnets that I wanted to convey. The metal black base I have in the video is certainly not a necessity and could be replace by a foam or cushion type base.
I've used this setup for over a couple years now and have yet to have a specimen come loose. When I'm working with a delicate light specimen I would never worry about it coming loose. With a heavy or awkward and delicate specimen I am naturally more cautious by using more mineral tack and careful placement of the center of gravity. But no matter how careful one can be accidents can still happen so with other peoples specimens or highly valuable specimens I always place padding around the base just in case.
_________________
Scott LaBorde |
|
| Back to top |
|
|
|