| View previous topic :: View next topic |
| Author |
Message |
Paul S

Joined: 20 Mar 2010
Posts: 79


|
 Posted: May 18, 2010 15:00 Post subject: Microscope photography lighting Posted: May 18, 2010 15:00 Post subject: Microscope photography lighting |
|
|
I have recently constructed a new lighting system for my microscope and its working so well that I'm going to share it all with you.
Keep in mind that my budget is very limited, so Im working with a secondhand stereomicroscope (a Novex (cheap brand of Euromex) AP-8 with 20x and 40x magnifications). This microscope had a simple 10 watt light 'bulb' which gave of a very yellow light. I compensated this with the settings in my photo camera (a Canon Powershot SX110 IS), so that the colors would appear less yellow. It worked but not as good as I wanted it be. It is also impossible to create shadow effects and highlight effects.
Because I didn't have the budget to buy a proper 'cold light' lighting system, I went for the cheaper LED version, made from parts I bought at a big electronics store.
I used super bright LEDs which were called bright sunny. It has the following color coordinates: X = 0.44, Y = 0.46, which gives a color temperature of around 3200K, which I find acceptable for photography, and which is rather good for LEDs.
I mounted them on one of those flexible USB-lights that you can plug into your computer. I used one that had only a single LED in it. By removing that one and replacing it with the super bright LED (and corresponding resistor) I got a nice and flexible lighting system. I can bend it to light a specimen from any angle I want. This way I can really manipulate shadows and highlights.
The photo's at the bottom show the results of the standard lighting (on the left) compared to the new LED lighting (on the right). I went for specimen with some nice colors to show the difference. I'm very pleased with the results so far, I'm thinking about adding another lighting 'arm' and maybe making one with an UV-LED for nice fluorescence microscope photos. I will also be making a proper base for the lights with a stand-alone power source and switches, I now use them plugged into my laptop.
You can always PM me for any details; I will be making a construction manual in the future.
I would like to hear your experiences with LED lighting and microscopy.
| Description: |
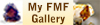
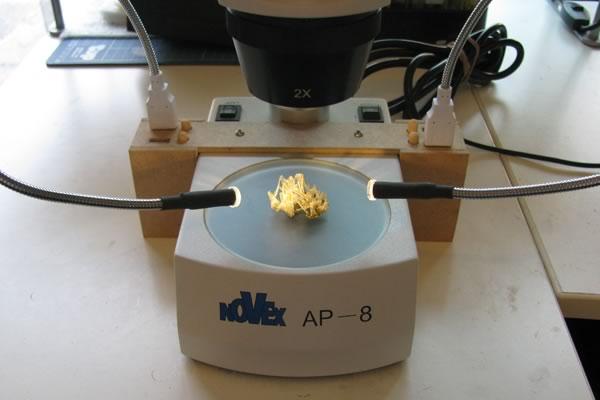
| A piece of lapis lazuli, 20x magnified. Old lighting left, new lighting right. |
|
| Viewed: |
32085 Time(s) |
|
| Description: |
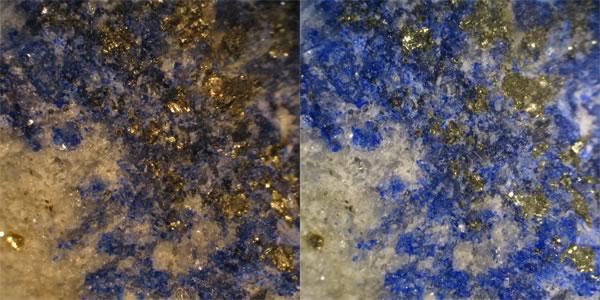
| A piece of malachite, 20x magnified. Old lighting left, new lighting right. |
|
| Viewed: |
32099 Time(s) |
|
| Description: |
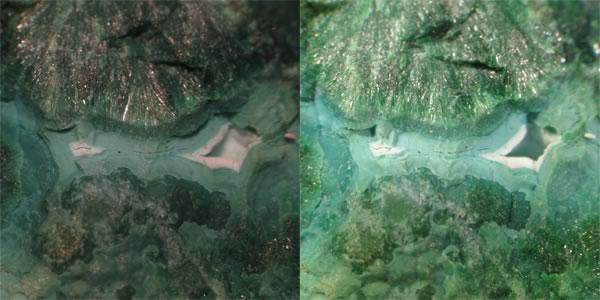
| A polished slice from a stalactite. Old lighting left, new lighting right. |
|
| Viewed: |
32092 Time(s) |
|
|
|
| Back to top |
|
 |
Les Presmyk
Joined: 06 Dec 2007
Posts: 372
Location: Gilbert, AZ
|
| Posted: May 18, 2010 15:39 Post subject: Re: Microscope photography lighting |
|
|
| Excellent job! How about taking a picture of your lighting set-up?
|
|
| Back to top |
|
|
Matt_Zukowski
Site Admin
Joined: 10 Apr 2009
Posts: 737
Location: Alaska
|
| Posted: May 18, 2010 18:23 Post subject: Re: Microscope photography lighting |
|
|
I did not know you could buy color rated LEDs at a local electronics store. That is good info.
After watching Jeff Scoville take a long time to place various cards around a specimen to light faces that are not properly lit, I thought that perhaps another way to get light around a specimen would be to have a bunch of small LED lights on long goosenecks that could be positioned to light the piece from many angles. I have found LED lights at the end of goosenecks (albeit short goosenecks) at hardware stores, but none had the proper color temperature. Perhaps I should experiment as you have and build my own.
I did contact the manufacturer of the fiber optic lighting seen in those fiber optic display cabinets people rent at Tucson (from Tucson Store Fixtures). The manufacturer is Schott. They do have lights at the end of goosenecks, but they seemed to me to be better for microscope lighting. I contacted them to see if they had a product that would work for me but they never contacted me back and i just dropped it.
|
|
| Back to top |
|
|
crocoite

Joined: 06 Feb 2009
Posts: 490
Location: Ballarat, Victoria
|
| Posted: May 19, 2010 05:21 Post subject: Re: Microscope photography lighting |
|
|
I use a 144 LED ring light. There are similar ones available on eBay now (search for LED ring light in Microscope Parts and Accessories). Its a perennial problem trying to get enough light particularly when you increase magnification.
I do have to do some minor adjustments some of the time if my camera doesn't compensate quite well enough, but it doesn't take much effort.
Regards
Steve
|
|
| Back to top |
|
|
Paul S
Joined: 20 Mar 2010
Posts: 79
|
| Posted: May 19, 2010 06:29 Post subject: Re: Microscope photography lighting |
|
|
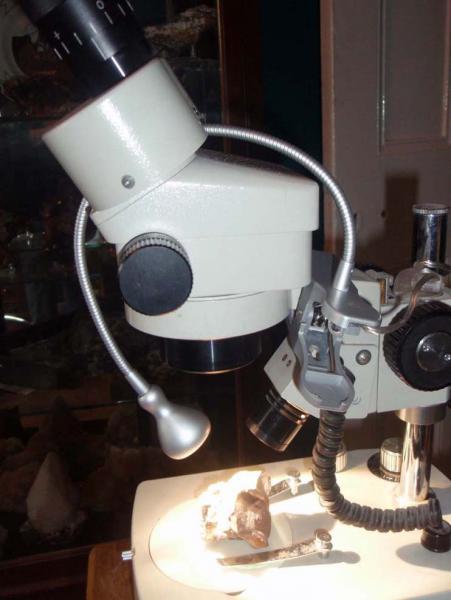
Thanks for the feedback, I have made some photos of the whole set-up. I have also calculated the price of making one USB gooseneck lamp:
- 3,99 for the gooseneck lamp
- 2,37 for the LED
(The resistor, soldering tin and shrink sleeve were bought in bulk, so I don't know their prices per piece, but it's not much.)
Total: 6,36
The price of the total system will increase, because I will be making a mobile base and power source to plug the lamps into, so that I can sit somewhere without the need of a laptop at hand. The length of one lamp uncoiled is 40cm, long enough to bend them to every direction.
The through lighting of the microscope is also made of a small 10 watt light bulb, so I think I will be changing that in the future as well. I have not tested it yet, because minerals don't need it that much. I do use it however for photographing and filming the growth of synthetic crystals (from salts), which are almost always transparent. Those are however future plans.
I have seen those LED ring lights and they are really nice, with good uniform lighting. I think the only downside is the lack of manipulation of shadows.
The adjustment of the light intensity with LEDs is a bit of a problem when you do it with electronics. You can however more easily just move the LED closer of further away from the object. This yields good results.
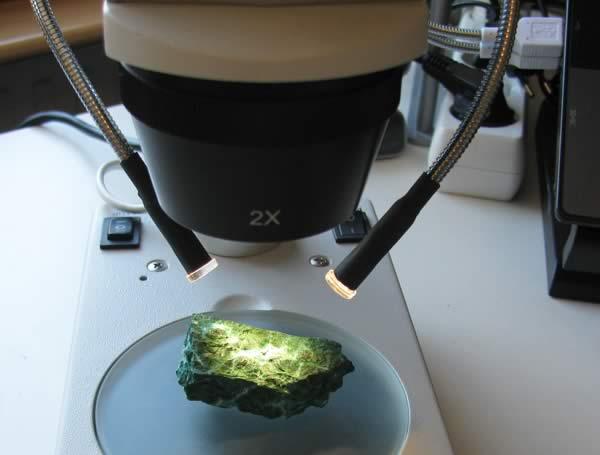
| Description: |
| A close-up of the complete set-up. A piece of malachite is being illuminated by two LED lamps. |
|
| Viewed: |
32010 Time(s) |
|
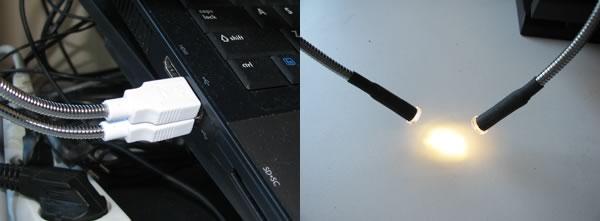
| Description: |
| On the left the two lamps, plugged into my laptop. On the right the area of illumination, which is uniform and large enough for microscopy. |
|
| Viewed: |
31995 Time(s) |
|
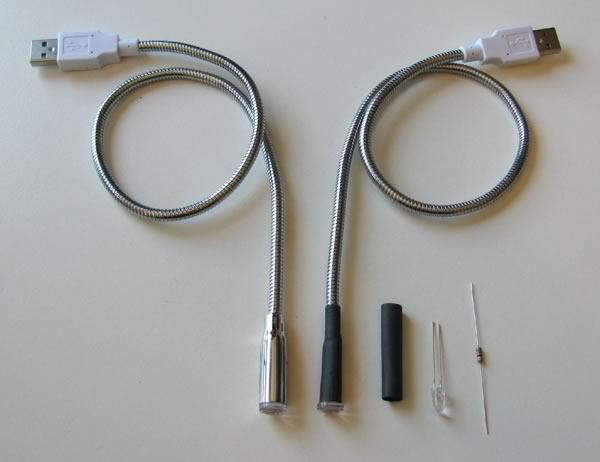
| Description: |
| The parts needed for making a lamp. From left to right: the original lamp, the finished one, a shrink sleeve, the LED and a resistor. |
|
| Viewed: |
32003 Time(s) |
|
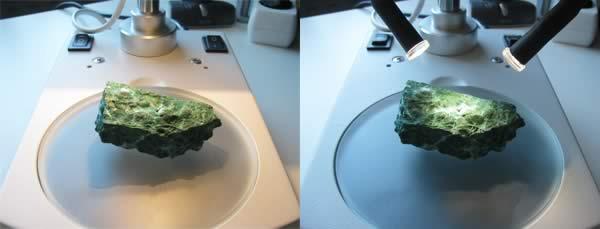
| Description: |
| Another comparison of the two lighting systems. On the left the normal light bulb from the microscope, on the right the new LED system. |
|
| Viewed: |
31989 Time(s) |
|
|
|
| Back to top |
|
|
ian jones
Joined: 29 Jul 2009
Posts: 112
Location: london
|
| Posted: May 19, 2010 10:20 Post subject: Re: Microscope photography lighting |
|
|
Nice bit of kit Paul
Light is always a problem, you never seem to be able to get enough. I am currently using a clip-on gooseneck LED that I got from IKEA as a subsidiary light source. It works fine and doubles the light output, albeit for about $20 compared to your much cheaper version.
You have certainly given us ideas to play with. Will look forward to seeing your finished project and the accompanying construction manual
| Description: |
|
| Viewed: |
32017 Time(s) |
|
|
|
| Back to top |
|
|
Matt_Zukowski
Site Admin
Joined: 10 Apr 2009
Posts: 737
Location: Alaska
|
| Posted: May 19, 2010 20:09 Post subject: Re: Microscope photography lighting |
|
|
| How did you determine the resistor ohms required? Is it merely in series with the LED? I wonder if I could put a variable resistor in series with the LED so i can adjust the amount of light?
|
|
| Back to top |
|
|
Paul S
Joined: 20 Mar 2010
Posts: 79
|
| Posted: May 20, 2010 03:55 Post subject: Re: Microscope photography lighting |
|
|
If you place the three components (LED, source and resistor) in series, you can easily calculate the resistor value with the following information:
- voltage of the source (USB voltage is 5 V)
- forward voltage of the LED (most bright LEDs are about 3 V)
- forward current of the LED (in most cases 20 mA)
You then need to:
1) substract LED voltage from source voltage
2) divide this voltage by the LED current
Example (with the above values):
1) 5 V - 3 V = 2 V
2) 2 V / 0.02 A = 100 Ohm
For those who want it the easy way, there are online calculators, like this one:
https://led.linear1.org/1led.wiz
(link normalized by FMF)
There is a problem however with variable resistors and LEDs. Because LEDs operate only around a certain voltage, they are on or off, which is different from light bulbs. It is possible to use a variable resistor, but the range in which the LED light intensity can be changed is rather small. The light intensity will drop quite fast, so you would need a variable resistor with a resistance that can be changed only a little bit.
A tip for those who want to use multiple LEDs on one source, make sure to build a parallel circuit and use separate resistors for every LED.
And Ian, the Ikea lamp you use looks really nice and flexible, but how is the color those LEDs put out? Some of them can be really blue, but yours looks really white/yellow, like mine.
|
|
| Back to top |
|
|
ian jones
Joined: 29 Jul 2009
Posts: 112
Location: london
|
| Posted: May 20, 2010 05:16 Post subject: Re: Microscope photography lighting |
|
|
Hi Paul
The colour temperature is described as warm white (Kelvin 3000), which would be like a normal incandescent lamp.
Got it as a stopgap as the internal light on my Meiji mic wasn't really bright enough at higher magnifications. Seems fine for general use, but haven't tried it as a photographic light source yet.
|
|
| Back to top |
|
|
Matt_Zukowski
Site Admin
Joined: 10 Apr 2009
Posts: 737
Location: Alaska
|
| Posted: May 20, 2010 05:39 Post subject: Re: Microscope photography lighting |
|
|
| Thanks Paul S
|
|
| Back to top |
|
|
Darby
Joined: 15 May 2010
Posts: 8
Location: Texas
|
| Posted: May 29, 2010 11:31 Post subject: Re: Microscope photography lighting |
|
|
| Nice job and inexpensive way to go about it. i recently purchased a new scope for my work and microphotography and i got a 144-LED light ring like one the guy listed above and see better results already i even have new photo addition myself. calling it "pyrite in seashell"
|
|
| Back to top |
|
|
Paul S
Joined: 20 Mar 2010
Posts: 79
|
| Posted: Jul 10, 2010 14:23 Post subject: Re: Microscope photography lighting |
|
|
I'm here with an update, for this week I had some time to make a nice stand for the goose-neck lights. The photo below will explain most of it, but there are some details that might need some extra clarification.
I have made four USB slots for the goose-necks to be fitted in. That way I can shine the light from four different directions on the specimen. I could also switch different lights, add colored LEDs or UV LEDs. In the last case this would be extra useful, for LEDs have only a single wavelength, so using three wavelengths for short, mid and long UV would be optimal.
It's also possible with this rig to turn off individual lights, creating shadows, etc. The lights are powered from the USB port of a computer, or a 9 volt battery can be connected to it. This makes it mobile and usable without a computer nearby.
The second photo was taken with this rig and you can clearly see the shadow behind the crystal of vanadite. It's also the first photo made with CombineZP, combining multiple photos and focus stacking them.
I don't have building plans for this system (yet), but I'm willing to help anyone who wants to build it themselves.
| Description: |
| My lighting system, now fully functional. A piece of selenite is being illuminated. The light is too yellow on this photo, it's a lot whiter in real life. |
|
| Viewed: |
31293 Time(s) |
|
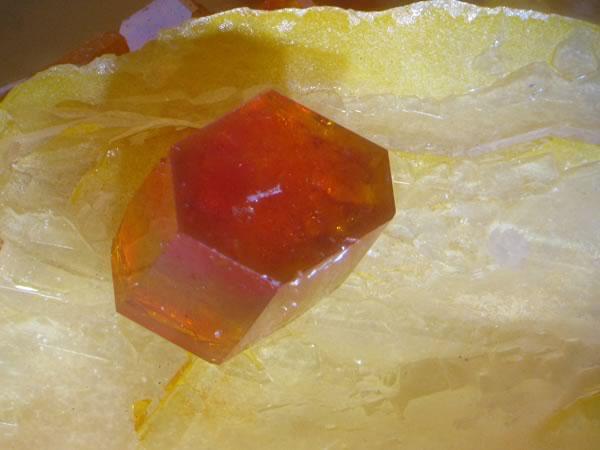
| Description: |
| Vanadite crystal on Baryte, from Mibladen, Morocco. Cropped and focus stacked using CombineZP, from 8 different pictures. FOV: 7mm. |
|
| Viewed: |
31263 Time(s) |
|
|
|
| Back to top |
|
|
|