| View previous topic :: View next topic |
| Author |
Message |
basti

Joined: 29 Mar 2012
Posts: 27
Location: Brno, Czech Republic


|
 Posted: Feb 25, 2020 06:12 Post subject: Re: Taking great photographs Posted: Feb 25, 2020 06:12 Post subject: Re: Taking great photographs |
|
|
Nothing against Jeff Scovil and his book - I actually like it. But as Jesse Fisher already mentioned - it was written for analog photography!
I have this book and I think at least half of it is absolutely useless as we do not shoot on film anymore. But whats worse, there is lot of critical things missing. I would not recommend this to a beginner.
I think its still a great book, but for advanced photographer, who can recognize what is still valid and what is not.
For digital photography, I strongly recommend starting with looking for some tabletop or product (stock) photography tutorials. There are zillions of tutorials online with every detail about gear used, settings, backgrounds etc. Especially tutorials about product photography for e-shops - simple and not too technical. Use this, set up that, click, done...
AFTER you have some basic overview how backgrounds/backdrops, lights and of course cameras + lenses work, you can start testing your own setups.
Even very primitive setup (attached) can be used to produce photos suitable to pro stockphoto agencies and magazines. But it takes some practice...
| Description: |
|
| Viewed: |
39472 Time(s) |

|
|
|
| Back to top |
|
 |
Jesse Fisher

Joined: 18 Mar 2009
Posts: 639
Location: San Francisco

|
| Posted: Feb 25, 2020 11:07 Post subject: Re: Taking great photographs |
|
|
Another good resource is the website/blog by Zbyněk Buřival, "Photographing Minerals" at
http://www.photographingminerals.com
(link normalized by FMF)
He has also published a book on the subject, which you can order from the site.
|
|
| Back to top |
|
|
fuss
Joined: 16 Aug 2018
Posts: 60
Location: Wisconsin
|
| Posted: Feb 25, 2020 11:57 Post subject: Re: Taking great photographs |
|
|
Duncan, your pentax should have a manual white balance setting where you can adjust the temperature in kelvins. Try starting at 5-6k and adjust up or down as needed. Might save some time/frustration I find auto WB can be inconsistent even in a controlled setting.
| Duncan Miller wrote: | This was my initial photographic set-up - wine box, tracing paper over cut-outs, Lumix point-and-shoot camera, sunlight outside. You may laugh, but with some computer tweaking the photographs were good enough to be published in an article in Lapis magazine.
I have graduated to the kitchen table, a Pentax DSLR with an old manual focus Macro lens, and a desk lamp with a frosted LED globe. The images still need some computer processing to correct the colour balance - not necessarily 'great' but they too are publishable. The manual focus lens really helps, and it's cooler working indoors in summer. |
|
|
| Back to top |
|
|
R Saunders
Joined: 28 Jul 2018
Posts: 126
Location: Michigan
|
| Posted: Feb 25, 2020 13:02 Post subject: Re: Taking great photographs |
|
|
| fuss wrote: | Duncan, your pentax should have a manual white balance setting where you can adjust the temperature in kelvins. Try starting at 5-6k and adjust up or down as needed. Might save some time/frustration I find auto WB can be inconsistent even in a controlled setting.
------
years ago with the VHS tape camcorders, a trick was to hold a white card in front of the lens when turning on too white balance it. not tried it with either of my digital cameras. I have OTT lights in tru-color. Fluorescent and LED'S. I find that with my Nikon 775 digital I often change the settings in minus half stops. Bob
------
| Duncan Miller wrote: | This was my initial photographic set-up - wine box, tracing paper over cut-outs, Lumix point-and-shoot camera, sunlight outside. You may laugh, but with some computer tweaking the photographs were good enough to be published in an article in Lapis magazine.
I have graduated to the kitchen table, a Pentax DSLR with an old manual focus Macro lens, and a desk lamp with a frosted LED globe. The images still need some computer processing to correct the colour balance - not necessarily 'great' but they too are publishable. The manual focus lens really helps, and it's cooler working indoors in summer. |
|
|
|
| Back to top |
|
|
basti
Joined: 29 Mar 2012
Posts: 27
Location: Brno, Czech Republic
|
| Posted: Feb 25, 2020 14:33 Post subject: Re: Taking great photographs |
|
|
I'm honored to by mentioned by a talented photographer like you Jesse! Thank you very much!
I do not consider myself as an expert - I just publish "as I do it", so people do not have to learn everything the hard way.
| Jesse Fisher wrote: | Another good resource is the website/blog by Zbyněk Buřival, "Photographing Minerals" at
http://www.photographingminerals.com
(link normalized by FMF)
He has also published a book on the subject, which you can order from the site. |
|
|
| Back to top |
|
|
Duncan Miller

Joined: 25 Apr 2009
Posts: 138
Location: South Africa
|
| Posted: Feb 25, 2020 14:48 Post subject: Re: Taking great photographs |
|
|
| fuss wrote: | | Duncan, your pentax should have a manual white balance setting where you can adjust the temperature in kelvins. Try starting at 5-6k and adjust up or down as needed. Might save some time/frustration I find auto WB can be inconsistent even in a controlled setting. |
Thanks for the advice, but I don't use the automatic white balance. I have tried setting the manual white balance to the appropriate rated colour temperature of the light globe and alternatively setting it manually before each exposure with a standard grey or white card. None of these produces a satisfactory result with the camera's automatic exposure metering. It requires adjusting the exposure by up to 2 exposure values, depending on the depth of colour of the specimen, and then also a colour adjustment on the computer. I am not happy with my Pentax K50 - it has a faulty capacitor that seriously compromises its functionality, but that is a different story - but posted my former and current photographic set-ups just to show that one can take perfectly acceptable photographs with quite rudimentary equipment.
|
|
| Back to top |
|
|
marvinlewinsky
Joined: 04 Feb 2020
Posts: 36
Location: Seattle
|
| Posted: Feb 25, 2020 17:06 Post subject: Re: Taking great photographs |
|
|
FMF input has been phenomenal thank you all.
The next obstacle is how to take great photos of large-cabinet to Museum size specimens. I have a beautiful Calcite specimen that is about 14 inch by 14 inch by 6 inch in size. I would like to get a full view photo, rather than a group of individual photos. I do not think photo stacking would be an option here, but I could be wrong.
Anyone ever taken photos of minerals in this size range, and here I am excluding photos taken at a Museum.
|
|
| Back to top |
|
|
basti
Joined: 29 Mar 2012
Posts: 27
Location: Brno, Czech Republic
|
| Posted: Feb 25, 2020 17:19 Post subject: Re: Taking great photographs |
|
|
Duncan, if you use a LED light source, that might be the problem. There are 4 things which often ruin the colors - of course I tried all of them :D
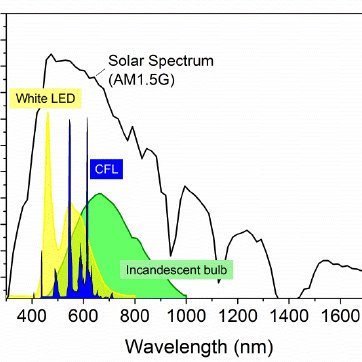
1) Most LED lights except some pricy pro photo equipment cause problems with color calibration. The source of this problem is the color spectrum of LED itself. Normal lights have very broad spectrum of colors which are mixing together into one final color. Many LEDs have just very sharp and narrow peaks in the color profile. (see attached picture)
2) Other very common issue is with cheap fluorescent bulbs/LEDs, which have color temperature bellow 3500K. All camera sensors have big issues with rendering proper colors under 3000K, resulting in strange hues and/or dull colors.
3) Make sure you have no color reflections on your specimen. I have very bad experience with shooting in bright colored T-shirt. Even the very pale brown painted walls somehow managed to ruin the color calibration. This is likely not your problem, light tents solve this.
4) Mixing various light sources, like daylight + LED or halogen + LED etc. Even if the LED/other bulb is "daylight", it does not mean that daylight has the same color temperature. Try shooting in the complete darkness with only one light source and you will see if that helps.
All these things are technical limits of lights and camera sensors. Getting reliable and good light source is often very challenging - unless you use a diffused daylight of course :D
| Duncan Miller wrote: | | fuss wrote: | | Duncan, your pentax should have a manual white balance setting where you can adjust the temperature in kelvins. Try starting at 5-6k and adjust up or down as needed. Might save some time/frustration I find auto WB can be inconsistent even in a controlled setting. |
Thanks for the advice, but I don't use the automatic white balance. I have tried setting the manual white balance to the appropriate rated colour temperature of the light globe and alternatively setting it manually before each exposure with a standard grey or white card. None of these produces a satisfactory result with the camera's automatic exposure metering. It requires adjusting the exposure by up to 2 exposure values, depending on the depth of colour of the specimen, and then also a colour adjustment on the computer. I am not happy with my Pentax K50 - it has a faulty capacitor that seriously compromises its functionality, but that is a different story - but posted my former and current photographic set-ups just to show that one can take perfectly acceptable photographs with quite rudimentary equipment. |
| Description: |
|
| Viewed: |
18594 Time(s) |
|
|
|
| Back to top |
|
|
basti
Joined: 29 Mar 2012
Posts: 27
Location: Brno, Czech Republic
|
| Posted: Feb 25, 2020 17:34 Post subject: Re: Taking great photographs |
|
|
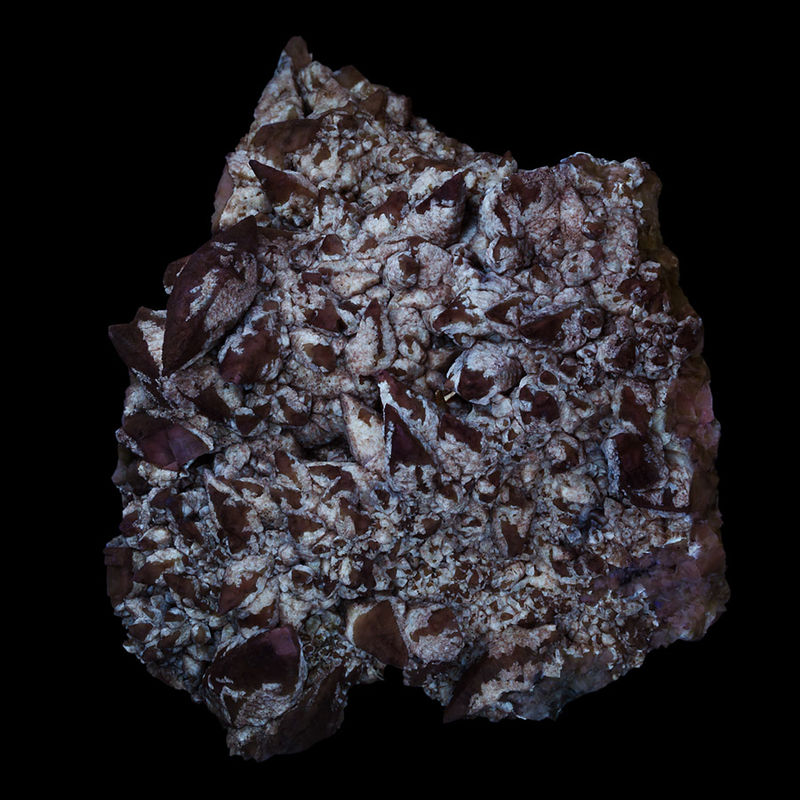
Yes, that is fun :) So first example: I had big calcite cluster about 30 cm (13") large. I needed a daylight photo and also UV light photo, as it is fluorescent.
Both shots were made from tripod from decent distance. For daylight, I simply put several white printer papers on the floor and used 2 lights from sides. Then I had to swap the background in Photoshop.
More fun was with shooting UV fluorescence. I did that in bathroom, where I put it on the (non-fluorescent) floor tiles - unfortunately the spacing between them was filled by pale filling visible in UV. So I made my best to remove the dust from the specimen, used a self-timer and hand held UV lamp. Then I swapped the background in Photoshop too. Result is attached.
| marvinlewinsky wrote: |
The next obstacle is how to take great photos of large-cabinet to Museum size specimens...
Anyone ever taken photos of minerals in this size range, and here I am excluding photos taken at a Museum. |
| Description: |
|
| Viewed: |
18582 Time(s) |
|
|
|
| Back to top |
|
|
basti
Joined: 29 Mar 2012
Posts: 27
Location: Brno, Czech Republic
|
| Posted: Feb 25, 2020 17:44 Post subject: Re: Taking great photographs |
|
|
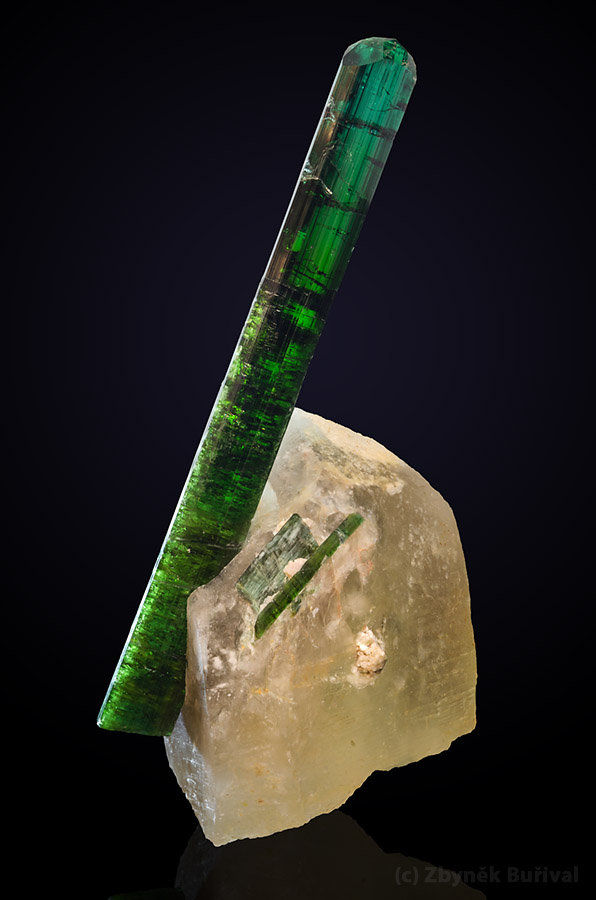
Second example: Long elbaite crystal about 28 cm (12") shot at Munich show, directly at the dealer stand. KARP Minerals should be mentioned for their hospitality.
I used a light tent (40 cm), my headlamp as a backlight and then small reflection plate made from cardboard and alu foil. The tourmaline was very dark and quartz pale - and I had only one light source. So I used a headlamp for backlight and then also from the other sides. And because of the size, I had to focus-stack the tourmaline. So pretty complex problem.
I used a tripod of course, so all shots taken were then merged in Photoshop into layers. In the end, I used 8 shots to cover the focus stacking and various light angles and "mapped" everything into final picture. The background is Photoshop made of course.
This is a pretty extreme example of course, but sometimes you do not have a proper studio available. Where the HW is missing, the SW (and some tricks) can help.
| Description: |
|
| Viewed: |
18593 Time(s) |
|
|
|
| Back to top |
|
|
marvinlewinsky
Joined: 04 Feb 2020
Posts: 36
Location: Seattle
|
| Posted: Feb 26, 2020 19:33 Post subject: Re: Taking great photographs |
|
|
| basti wrote: | Yes, that is fun :) So first example: I had big calcite cluster about 30 cm (13") large. I needed a daylight photo and also UV light photo, as it is fluorescent.
Both shots were made from tripod from decent distance. For daylight, I simply put several white printer papers on the floor and used 2 lights from sides. Then I had to swap the background in Photoshop.
More fun was with shooting UV fluorescence. I did that in bathroom, where I put it on the (non-fluorescent) floor tiles - unfortunately the spacing between them was filled by pale filling visible in UV. So I made my best to remove the dust from the specimen, used a self-timer and hand held UV lamp. Then I swapped the background in Photoshop too. Result is attached.
| marvinlewinsky wrote: |
The next obstacle is how to take great photos of large-cabinet to Museum size specimens...
What recommendations for Calcite (white) on Calcite on Quartz? It would appear that taking pictures of white minerals always presents extra challenges. Any examples (with setups) would be appreciated!
Anyone ever taken photos of minerals in this size range, and here I am excluding photos taken at a Museum. |
|
|
|
| Back to top |
|
|
marvinlewinsky
Joined: 04 Feb 2020
Posts: 36
Location: Seattle
|
| Posted: Feb 26, 2020 19:35 Post subject: Re: Taking great photographs |
|
|
| What recommendations for Calcite (white) on Calcite on Quartz? It would appear that taking pictures of white minerals always presents extra challenges. Any examples (with setups) would be appreciated!
|
|
| Back to top |
|
|
Matt_Zukowski
Site Admin
Joined: 10 Apr 2009
Posts: 737
Location: Alaska
|
| Posted: Feb 26, 2020 22:16 Post subject: Re: Taking great photographs |
|
|
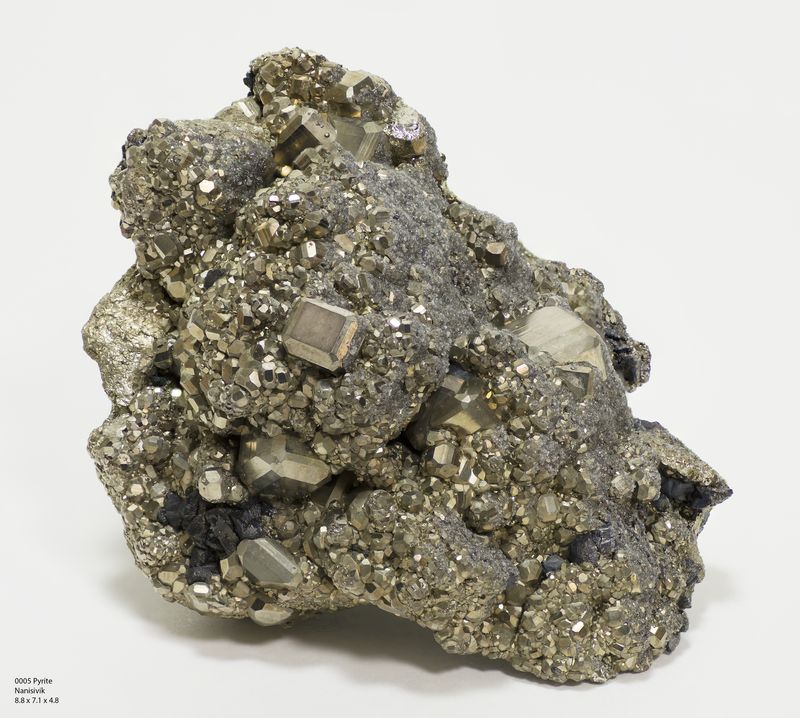
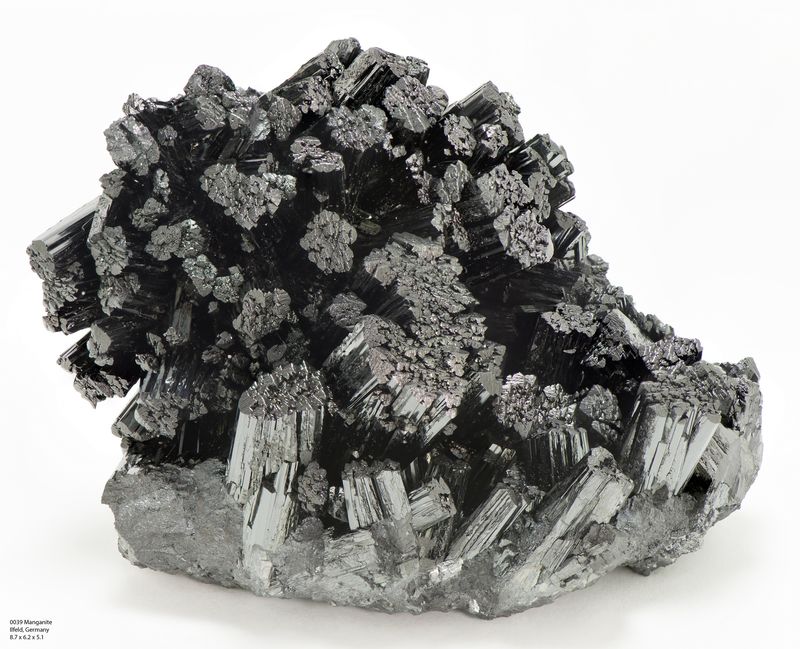
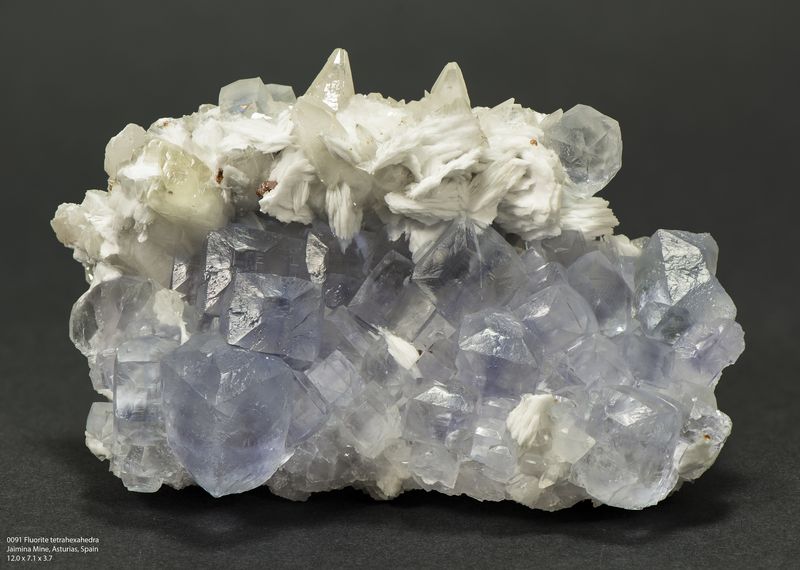
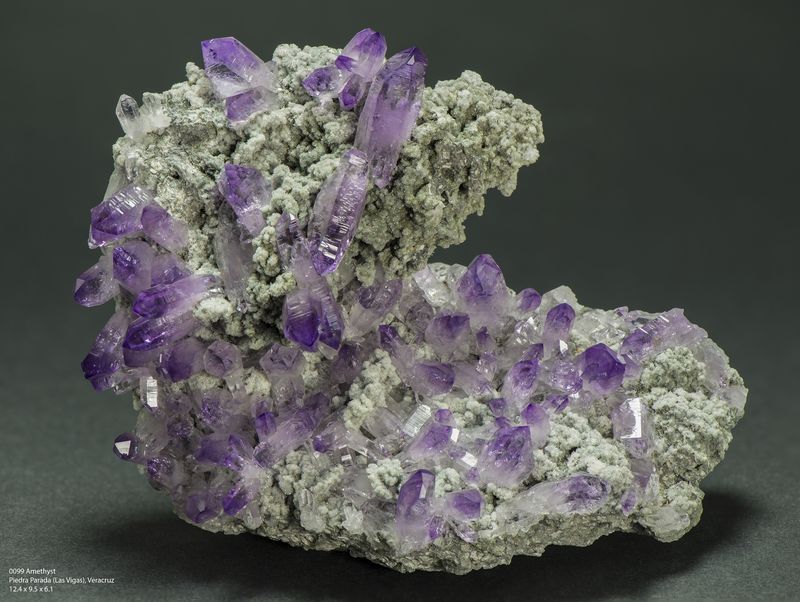
I do not shoot through glass like many others because i find that edges of the glass limit how i can stage the shot. I use two backgrounds: black and white. I generally use black backgrounds for white minerals, white for black minerals, and then generally whatever i have up for colored minerals. The backgrounds i use are Savage Seamless Background Paper.
I attach the background paper to the edge of the desk in the foreground and then curve it up to attach to the wall behind the desk. The curve keeps any creases or seams from appearing in the picture, and sometimes adds something of a gradient to the background. Some examples of my results are attached.
BTW - i am not saying that i am a good photographer. I am just telling you what i do and showing you the results. Perhaps the info will be useful to you. Good luck.
| Mineral: | Pyrite |
| Locality: | | Nanisivik Mine, Nanisivik, Baffin Island, Nunavut Territory, Canada |  |
|
| Dimensions: | 8.8 x 7.1 cm |
| Description: |
|
| Viewed: |
18415 Time(s) |
|
| Locality: | | Ilfeld, Nordhausen, Nordhausen District, Thuringia/Thüringen, Germany | |
|
| Dimensions: | 8.7 x 6.2 cm |
| Description: |
|
| Viewed: |
18343 Time(s) |
|
| Mineral: | fluorite |
| Locality: | | Jaimina Mine, Obdulia vein, Caravia mining area, Trechorio, Carrales, Caravia, Comarca Oriente, Principality of Asturias (Asturias), Spain | |
|
| Dimensions: | 12 x 7.1 cm |
| Description: |
|
| Viewed: |
18422 Time(s) |
|
| Mineral: | Quartz |
| Locality: | | Piedra Parada (Las Vigas), Municipio Tatatila, Veracruz (Veracruz de Ignacio de la Llave), Mexico | |
|
| Dimensions: | 12.4 x 9.5 cm |
| Description: |
|
| Viewed: |
18436 Time(s) |
|
|
|
| Back to top |
|
|
Bob Harman
Joined: 06 Nov 2015
Posts: 765
|
| Posted: Feb 26, 2020 22:17 Post subject: Re: Taking great photographs |
|
|
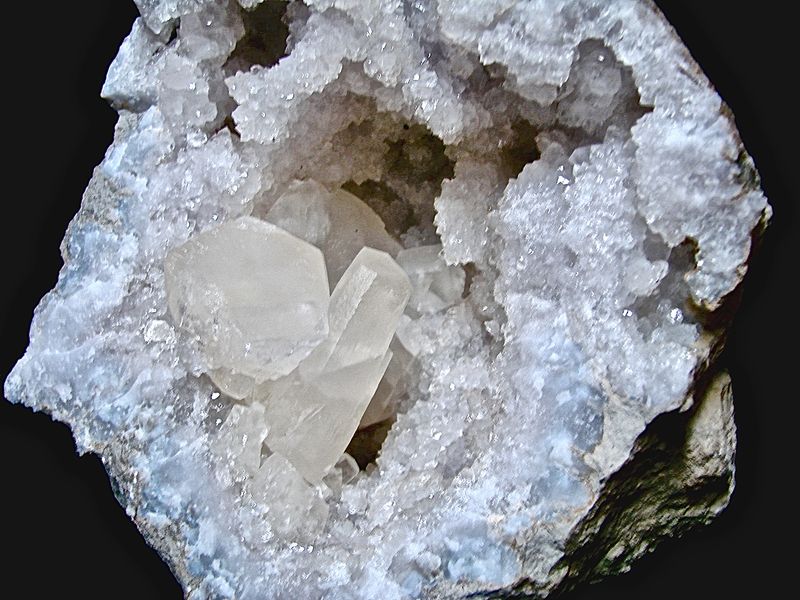
Mr Lewinsky,
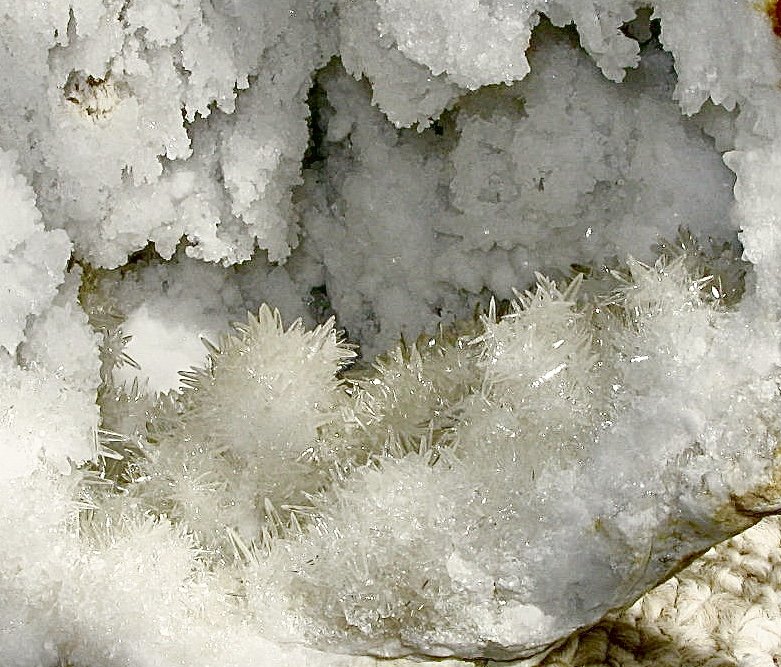
Here are 2 examples from my collection. Both self-collected and previously pictured on this site. Both are white calcite on white quartz. Both self-photographed; altho not great, they get the message of my very large specimens across to the viewers. For the 2nd example, using a flat dark background would have been a help for me. But still they were adequately photographed!
They say a picture is worth a thousand words. For me it is time for a few pictures of your specimens to help get further suggestions. Without further discussions, some pictures now please! BOB
| Mineral: | Calcite on Quartz |
| Locality: | | State Route 37 road cuts, Harrodsburg, Clear Creek Township, Monroe County, Indiana, USA | |
|
| Dimensions: | Calcite is 5.5 cm in a 16 + cm geode |
| Description: |
|
| Viewed: |
18362 Time(s) |
|
| Mineral: | Calcite on Quartz |
| Description: |
Locality: Private land, Washington County Indiana
Area of Calcite is about 15 cm in a 25+ cm geode |
|
| Viewed: |
18392 Time(s) |
|
|
|
| Back to top |
|
|
marvinlewinsky
Joined: 04 Feb 2020
Posts: 36
Location: Seattle
|
| Posted: Feb 27, 2020 15:02 Post subject: Re: Taking great photographs |
|
|
| Bob Harman wrote: | Mr Lewinsky,
Here are 2 examples from my collection. Both self-collected and previously pictured on this site. Both are white calcite on white quartz. Both self-photographed; altho not great, they get the message of my very large specimens across to the viewers. For the 2nd example, using a flat dark background would have been a help for me. But still they were adequately photographed!
They say a picture is worth a thousand words. For me it is time for a few pictures of your specimens to help get further suggestions. Without further discussions, some pictures now please! BOB |
Dear Mr. Bob:
Thank you for your contributions.
My mother often told me, as probably did your mother tell you all good things come to those who wait' and wait you must. I have ordered a light tent and a few lights. The estimated TOA is the first or second week of March. I am uneasy about uploading photos that most would consider second-rate! I strive for perfection. I am waiting for approval to post the vendors pictures, but these will not appear on my collection page for obvious reasons.
I could upload some videos if that is OK, but how do I go about doing it?
ML
|
|
| Back to top |
|
|
|